突然有个需求,然后花了差不多半个小时指挥GPT4干完了... 说实话,这效率也太快了,要是让我从头手打,估计要折腾一下午。
这篇博客就记录下如何和GPT打配合搞定ShinyApp,并且通过CLI program wapper creator工具将shinyapp制作成插件分享给大家。
省流版本(工具使用)
需求
在磕盐(ban zhuan)的过程中难免会遇到合并表格这种破事,比如你拿到了几百个基因,想去找他的注释,看表达量,当然可以通过vlookup等操作可以实现,但是遇到一对多的情况就比较捉🐔了,R语言的dplyr包提供了join系列函数来通过不同的方式连接两个表格,相当方便,博士期间为了搞定表格合并的问题整的人都快头秃了,所以我相信这一定会是一个重要的需求,不如通过shinyapp实现。简单的通过上传文件,选择连接方式,下载合并后的表格。
连接方式解释
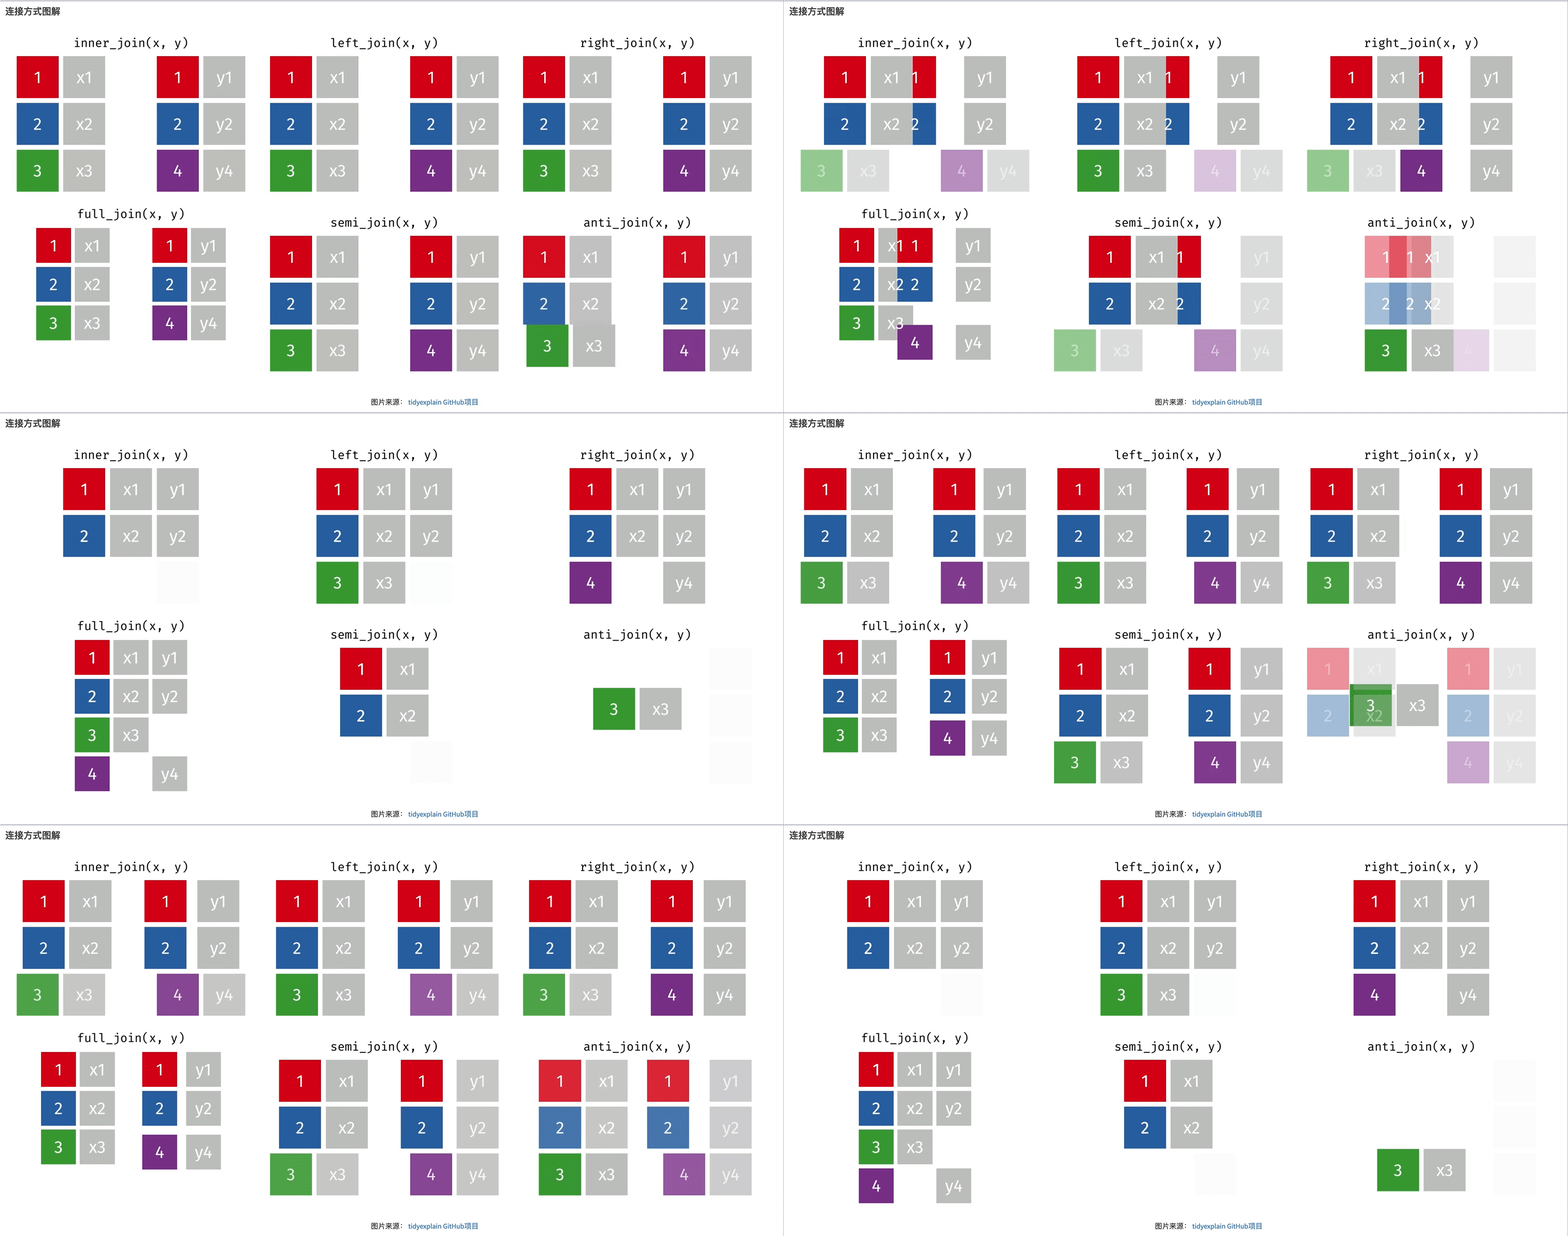
感觉文字是苍白的,Garrick Aden-Buie 大佬搞了个动态图来解释左连接(left join),右连接(right join),全连接(full join),半连接(semi join),内连接(inner join)和反连接(anti join)的解释,这个.... 再看不懂说不过去了吧....
下载和使用
下载
目前还没登录TBtools插件商店,后续CJ会搞上去,安装方法就是在插件商店找到File-Join ShinyApp插件,会定位到牛奶快传,下载安装。目前迫不及待想体验的可以去github下载,windows用户下载FileJoin-win.plugin, intel mac用户下载filejoin.plugin, arm mac用户再等等吧... 或者直接通过Rstudio启动。
运行
使用很简单,运行插件弹出网页后,根据下图上传文件,设置参数直接会获得表格... 没啥门槛,上传表格后,程序会自动获得文件的列名,分别选择两个文件中用来查找的列名,然后选择合并方式进行合并,如果忘了,左侧选项卡还有对不同类型join的解释。
Soure file demo
| GeneID | Sample_01 | Sample_02 | Sample_03 | Sample_04 | Sample_05 |
|---|---|---|---|---|---|
| Gene_001 | 312 | 214 | 406 | 616 | 289 |
| Gene_002 | 465 | 180 | 422 | 605 | 994 |
| Gene_003 | 687 | 658 | 276 | 218 | 53 |
| Gene_004 | 369 | 215 | 4 | 691 | 155 |
| Gene_005 | 903 | 215 | 887 | 203 | 777 |
| Gene_006 | 154 | 240 | 162 | 272 | 823 |
| Gene_007 | 35 | 553 | 739 | 505 | 248 |
| Gene_008 | 10 | 946 | 306 | 946 | 658 |
| Gene_009 | 359 | 1 | 346 | 484 | 757 |
| Gene_010 | 277 | 181 | 493 | 636 | 409 |
| Gene_011 | 588 | 688 | 956 | 51 | 463 |
| Gene_012 | 502 | 30 | 105 | 905 | 42 |
| Gene_013 | 595 | 41 | 55 | 838 | 600 |
| Gene_014 | 66 | 64 | 524 | 726 | 355 |
Probe file demo
| Probe | Type |
|---|---|
| Gene_001 | case |
| Gene_005 | case |
| Gene_006 | case |
| Gene_007 | case |
| Gene_008 | case |
| Gene_012 | case |
| Gene_013 | case |
| Gene_014 | case |
| Gene_015 | case |
| Gene_016 | case |
| Gene_017 | control |
| Gene_018 | control |
| Gene_019 | control |
| Gene_020 | control |
| Gene_021 | control |
| Gene_022 | control |
| Gene_023 | control |
| Gene_024 | control |
| Gene_025 | control |
| Gene_026 | control |
| Gene_027 | control |
| Gene_028 | control |
| Gene_029 | control |
| Gene_030 | control |
start your job
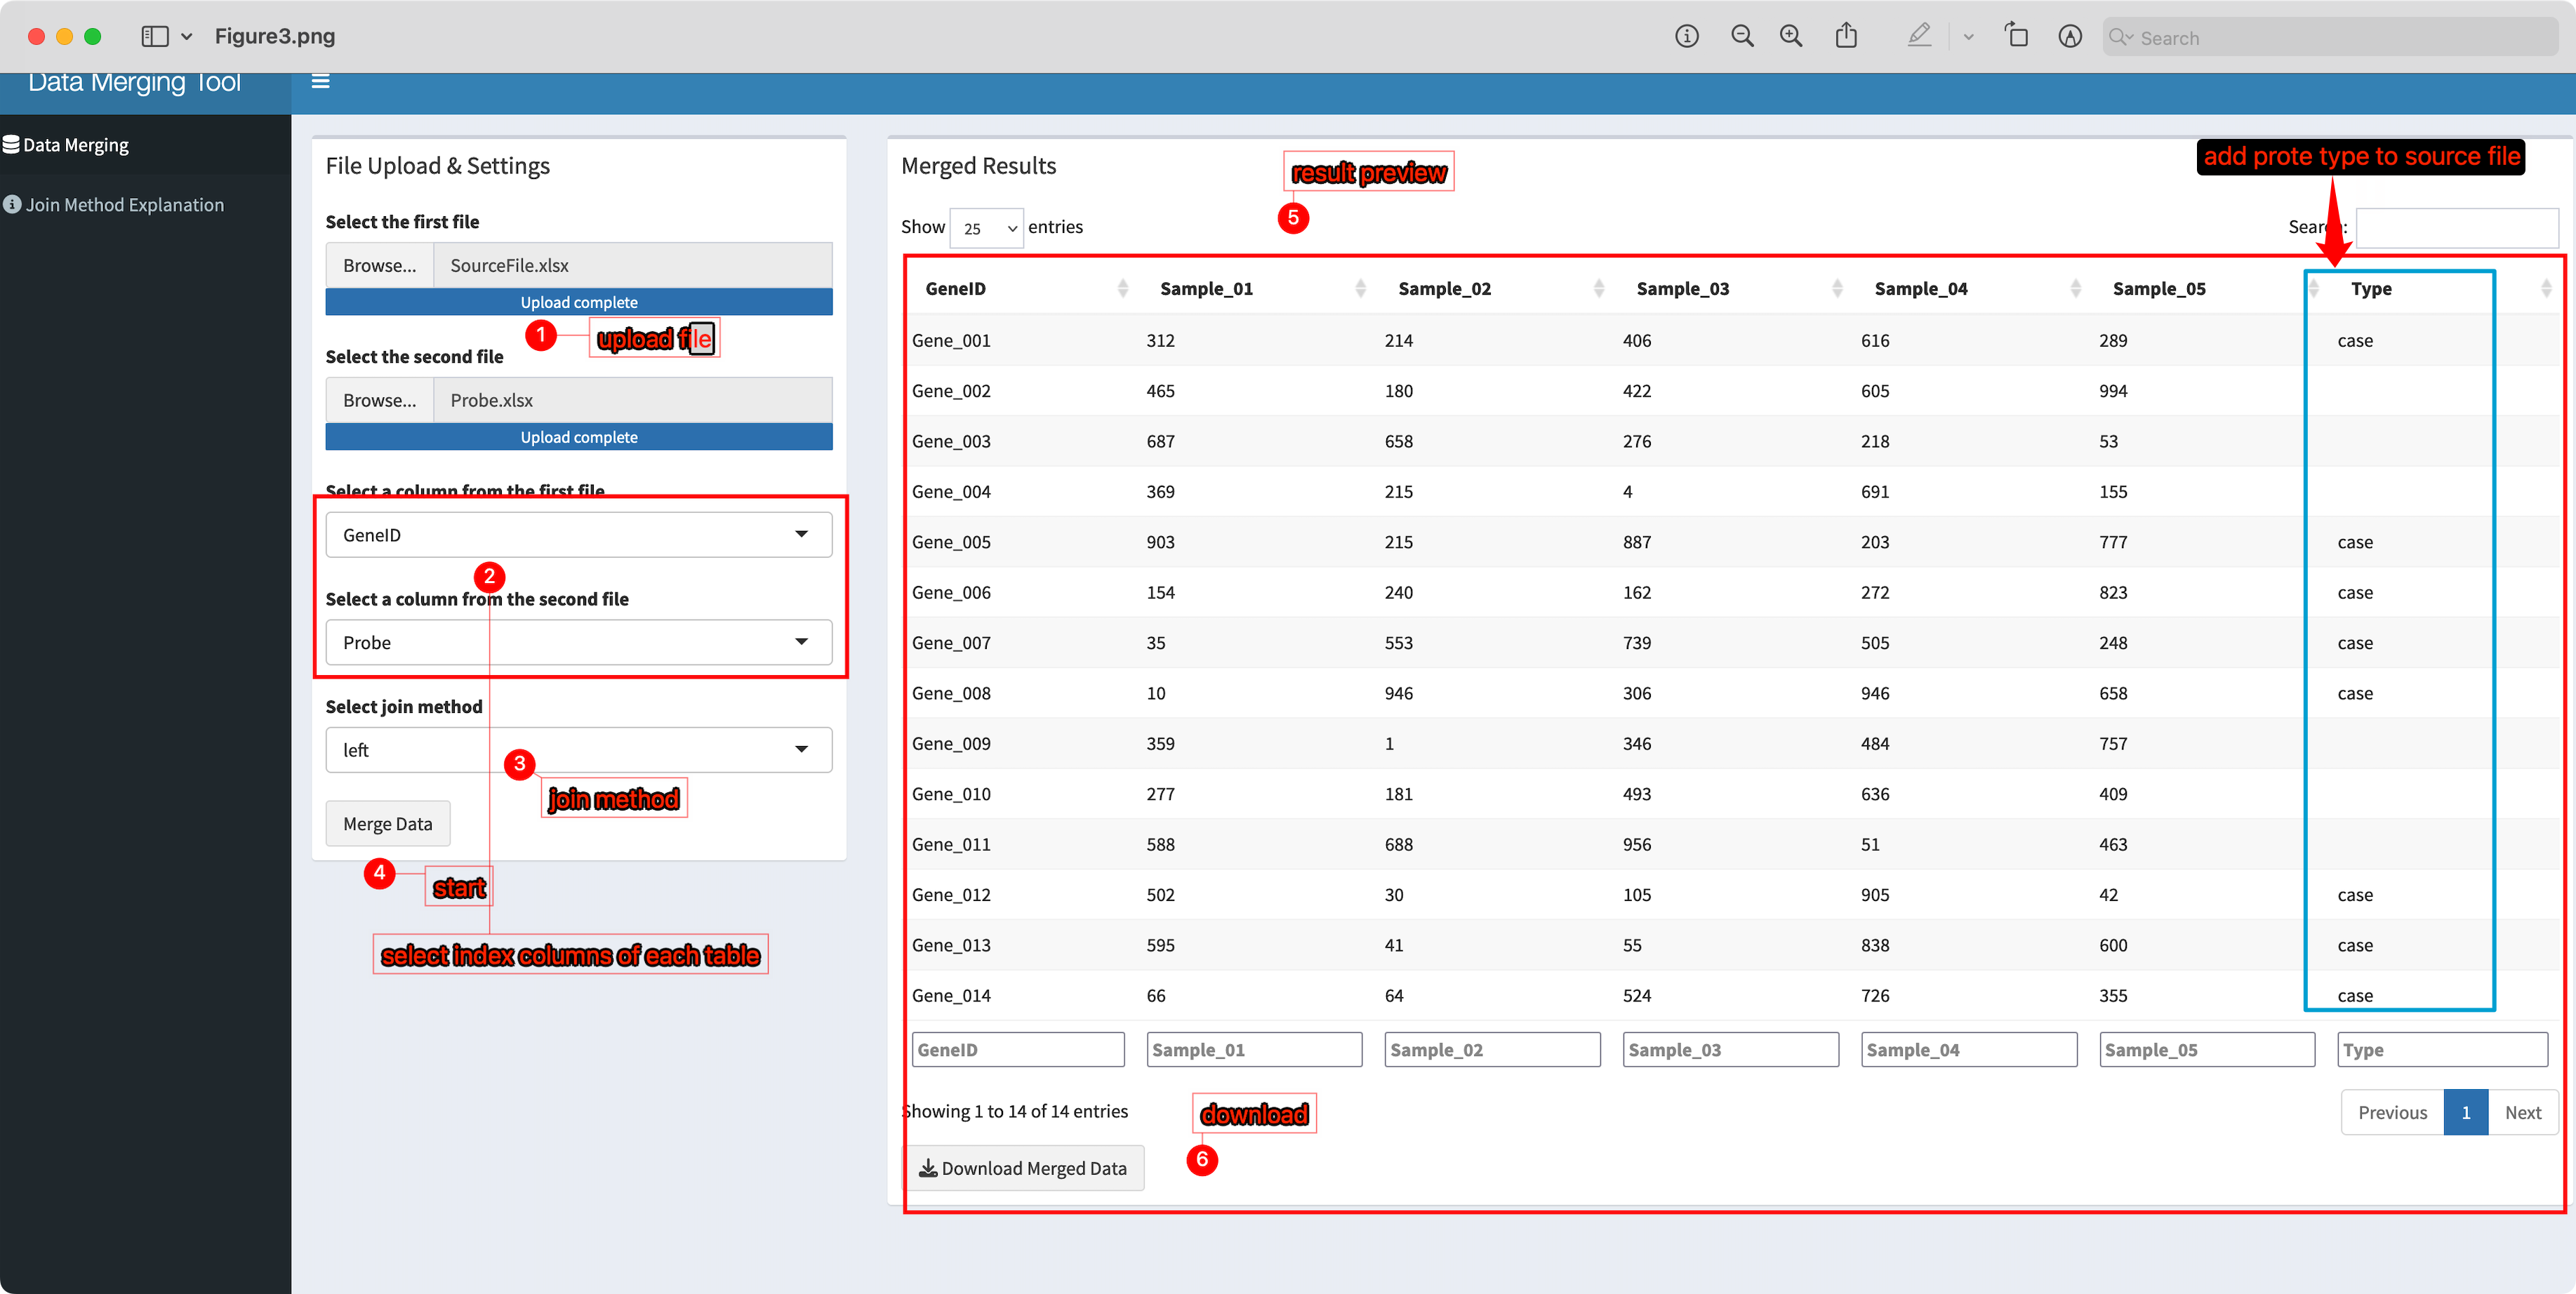
可以通过右侧预览合并结果。通过下载按钮下载合并文件,默认导出.csv格式。
开发篇
让GPT给你写shiny
写初步框架
有手就行有点夸张了,GPT虽然智能,但也很智障,灵活运用会提高干活的效率,所以这里有手就行的前提是你对shinyapp的开发已经有了一些了解。
比如在让这货写代码之前,脑子里已经有了UI大致的结构,所以我告诉他:
写一个shiny插件,主要是用来做表格合并,数据导入用bruceR的import函数,需要两个输入数据框,输入文件大小控制在2GB,UI界面为一个tabPanel,sidesidebar中放置两个上传文件的组间,接着是两个selectInput,selectInput内容需要通过类似
 observe({
    updateSelectInput(session, "outlier",choices = s_outlier())
  })
根据输入文件的colname来提供选项,作用是在上传文件后自动获得文件的列名。
然后用户通过选择两个的列名,根据两个文件的这两列通过dplyr join系列函数进行合并,最后在mainPanel中通过renderDataTable预览结果,并且通过download下载。
它很快给出了整体的框架,但是运行后发现他造了个不存在的参数, 就是需求中让限制上传文件大小的代码正确的应该是
options(shiny.maxRequestSize = 300*1024^2)
而 fileInput("file1", "选择第一个文件", accept = c(".csv", ".txt", ".xlsx"), multiple = FALSE, sizeLimit = 2*1024^3)中的 sizeLimit 参数并不存在。这需要修改下。 下面是它给的代码最终修改版本,也跳网页了,说明能用 就是丑了点。
library(shiny)
library(DT)
library(bruceR)
library(dplyr)
options(shiny.maxRequestSize = 300*1024^2)
ui <- fluidPage(
  tabsetPanel(
    tabPanel("数据合并",
             sidebarLayout(
               sidebarPanel(
                 # fileInput("file1", "选择第一个文件", accept = c(".csv", ".txt", ".xlsx"), multiple = FALSE, sizeLimit = 2*1024^3), ## sizeLimit参数不存在
                 # fileInput("file2", "选择第二个文件", accept = c(".csv", ".txt", ".xlsx"), multiple = FALSE, sizeLimit = 2*1024^3),
                 fileInput("file1", "选择第一个文件", accept = c(".csv", ".txt", ".xlsx"), multiple = FALSE),
                 fileInput("file2", "选择第二个文件", accept = c(".csv", ".txt", ".xlsx"), multiple = FALSE),
                 selectInput("select1", "选择第一个文件的列", ""),
                 selectInput("select2", "选择第二个文件的列", "")
               ),
               mainPanel(
                 DTOutput("table"),
                 downloadButton("downloadData", "下载合并的数据")
               )
             )
    )
  )
)

server <- function(input, output, session) {
  data1 <- reactive({
    req(input$file1)
    import(input$file1$datapath)
  })

  data2 <- reactive({
    req(input$file2)
    import(input$file2$datapath)
  })

  observe({
    updateSelectInput(session, "select1", choices = names(data1()))
  })

  observe({
    updateSelectInput(session, "select2", choices = names(data2()))
  })

  # merged_data <- reactive({
  #   req(input$select1, input$select2)
  #  left_join(data1(), data2(), by = c(input$select1 = input$select2))
  #
  # })
  merged_data <- reactive({
    req(input$select1, input$select2)
    left_join(data1(), data2(), by = setNames(input$select2, input$select1))
  })


  output$table <- renderDT({
    merged_data()
  })

  output$downloadData <- downloadHandler(
    filename = function() {
      paste("merged_data.csv")
    },
    content = function(file) {
      write.csv(merged_data(), file)
    }
  )
}

shinyApp(ui = ui, server = server)
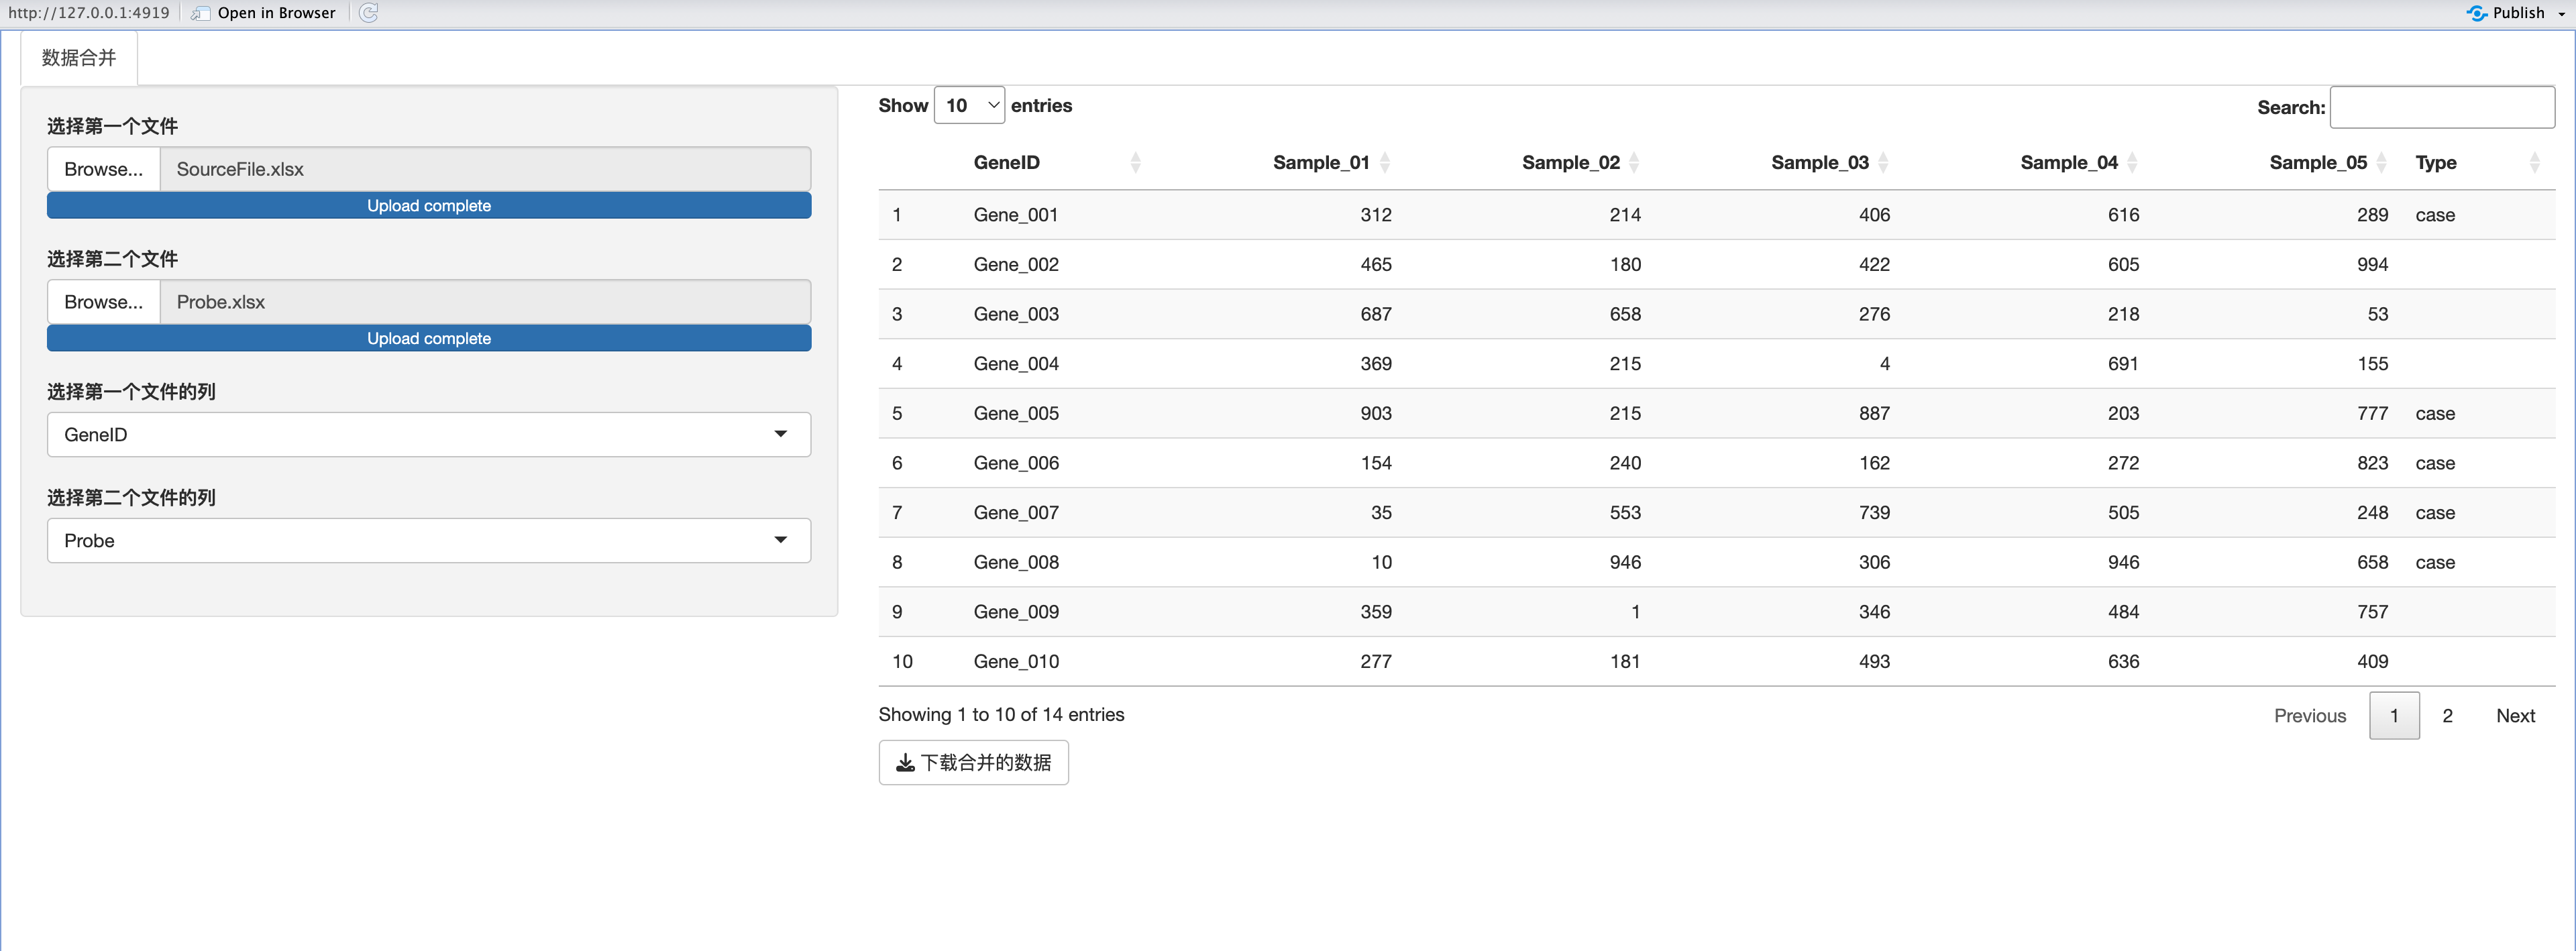
但是我们发现他没有理解我的意思,默认的只用了left join,所以我又让他加上其他类型的,然后在加上一个action button来执行。
User 增加一个selectInput,合并方式,分为left ,right,inner,full,semi,默认为left,然后增加一个action button,参数设置好在显示表格。
这次它没有出问题,添加了action button,而且在切换不同方法的时候聪明的使用了switch函数。我也偷学了一招。
library(shiny)
library(DT)
library(bruceR)
library(dplyr)
options(shiny.maxRequestSize = 300*1024^2)

ui <- fluidPage(
  tabsetPanel(
    tabPanel("数据合并",
             sidebarLayout(
               sidebarPanel(
                 fileInput("file1", "选择第一个文件", accept = c(".csv", ".txt", ".xlsx"), multiple = FALSE),
                 fileInput("file2", "选择第二个文件", accept = c(".csv", ".txt", ".xlsx"), multiple = FALSE),
                 selectInput("select1", "选择第一个文件的列", ""),
                 selectInput("select2", "选择第二个文件的列", ""),
                 selectInput("joinType", "选择合并方式", choices = c("left", "right", "inner", "full", "semi"), selected = "left"),
                 actionButton("mergeBtn", "合并数据")
               ),
               mainPanel(
                 DTOutput("table"),
                 downloadButton("downloadData", "下载合并的数据")
               )
             )
    )
  )
)

server <- function(input, output, session) {
  data1 <- reactive({
    req(input$file1)
    import(input$file1$datapath)
  })

  data2 <- reactive({
    req(input$file2)
    import(input$file2$datapath)
  })

  observe({
    updateSelectInput(session, "select1", choices = names(data1()))
  })

  observe({
    updateSelectInput(session, "select2", choices = names(data2()))
  })

  merged_data <- eventReactive(input$mergeBtn, {
    req(input$select1, input$select2, input$joinType)
    switch(input$joinType,
           "left" = left_join(data1(), data2(), by = setNames(input$select2, input$select1)),
           "right" = right_join(data1(), data2(), by = setNames(input$select2, input$select1)),
           "inner" = inner_join(data1(), data2(), by = setNames(input$select2, input$select1)),
           "full" = full_join(data1(), data2(), by = setNames(input$select2, input$select1)),
           "semi" = semi_join(data1(), data2(), by = setNames(input$select2, input$select1))
    )
  })

  output$table <- renderDT({
    req(merged_data())
    merged_data()
  })

  output$downloadData <- downloadHandler(
    filename = function() {
      paste("merged_data.csv")
    },
    content = function(file) {
      write.csv(merged_data(), file)
    }
  )
}

shinyApp(ui = ui, server = server)
基本上没问题了,其实到这里就完全OK了,也好用,就是有点丑。所以我后续有加了一些要求
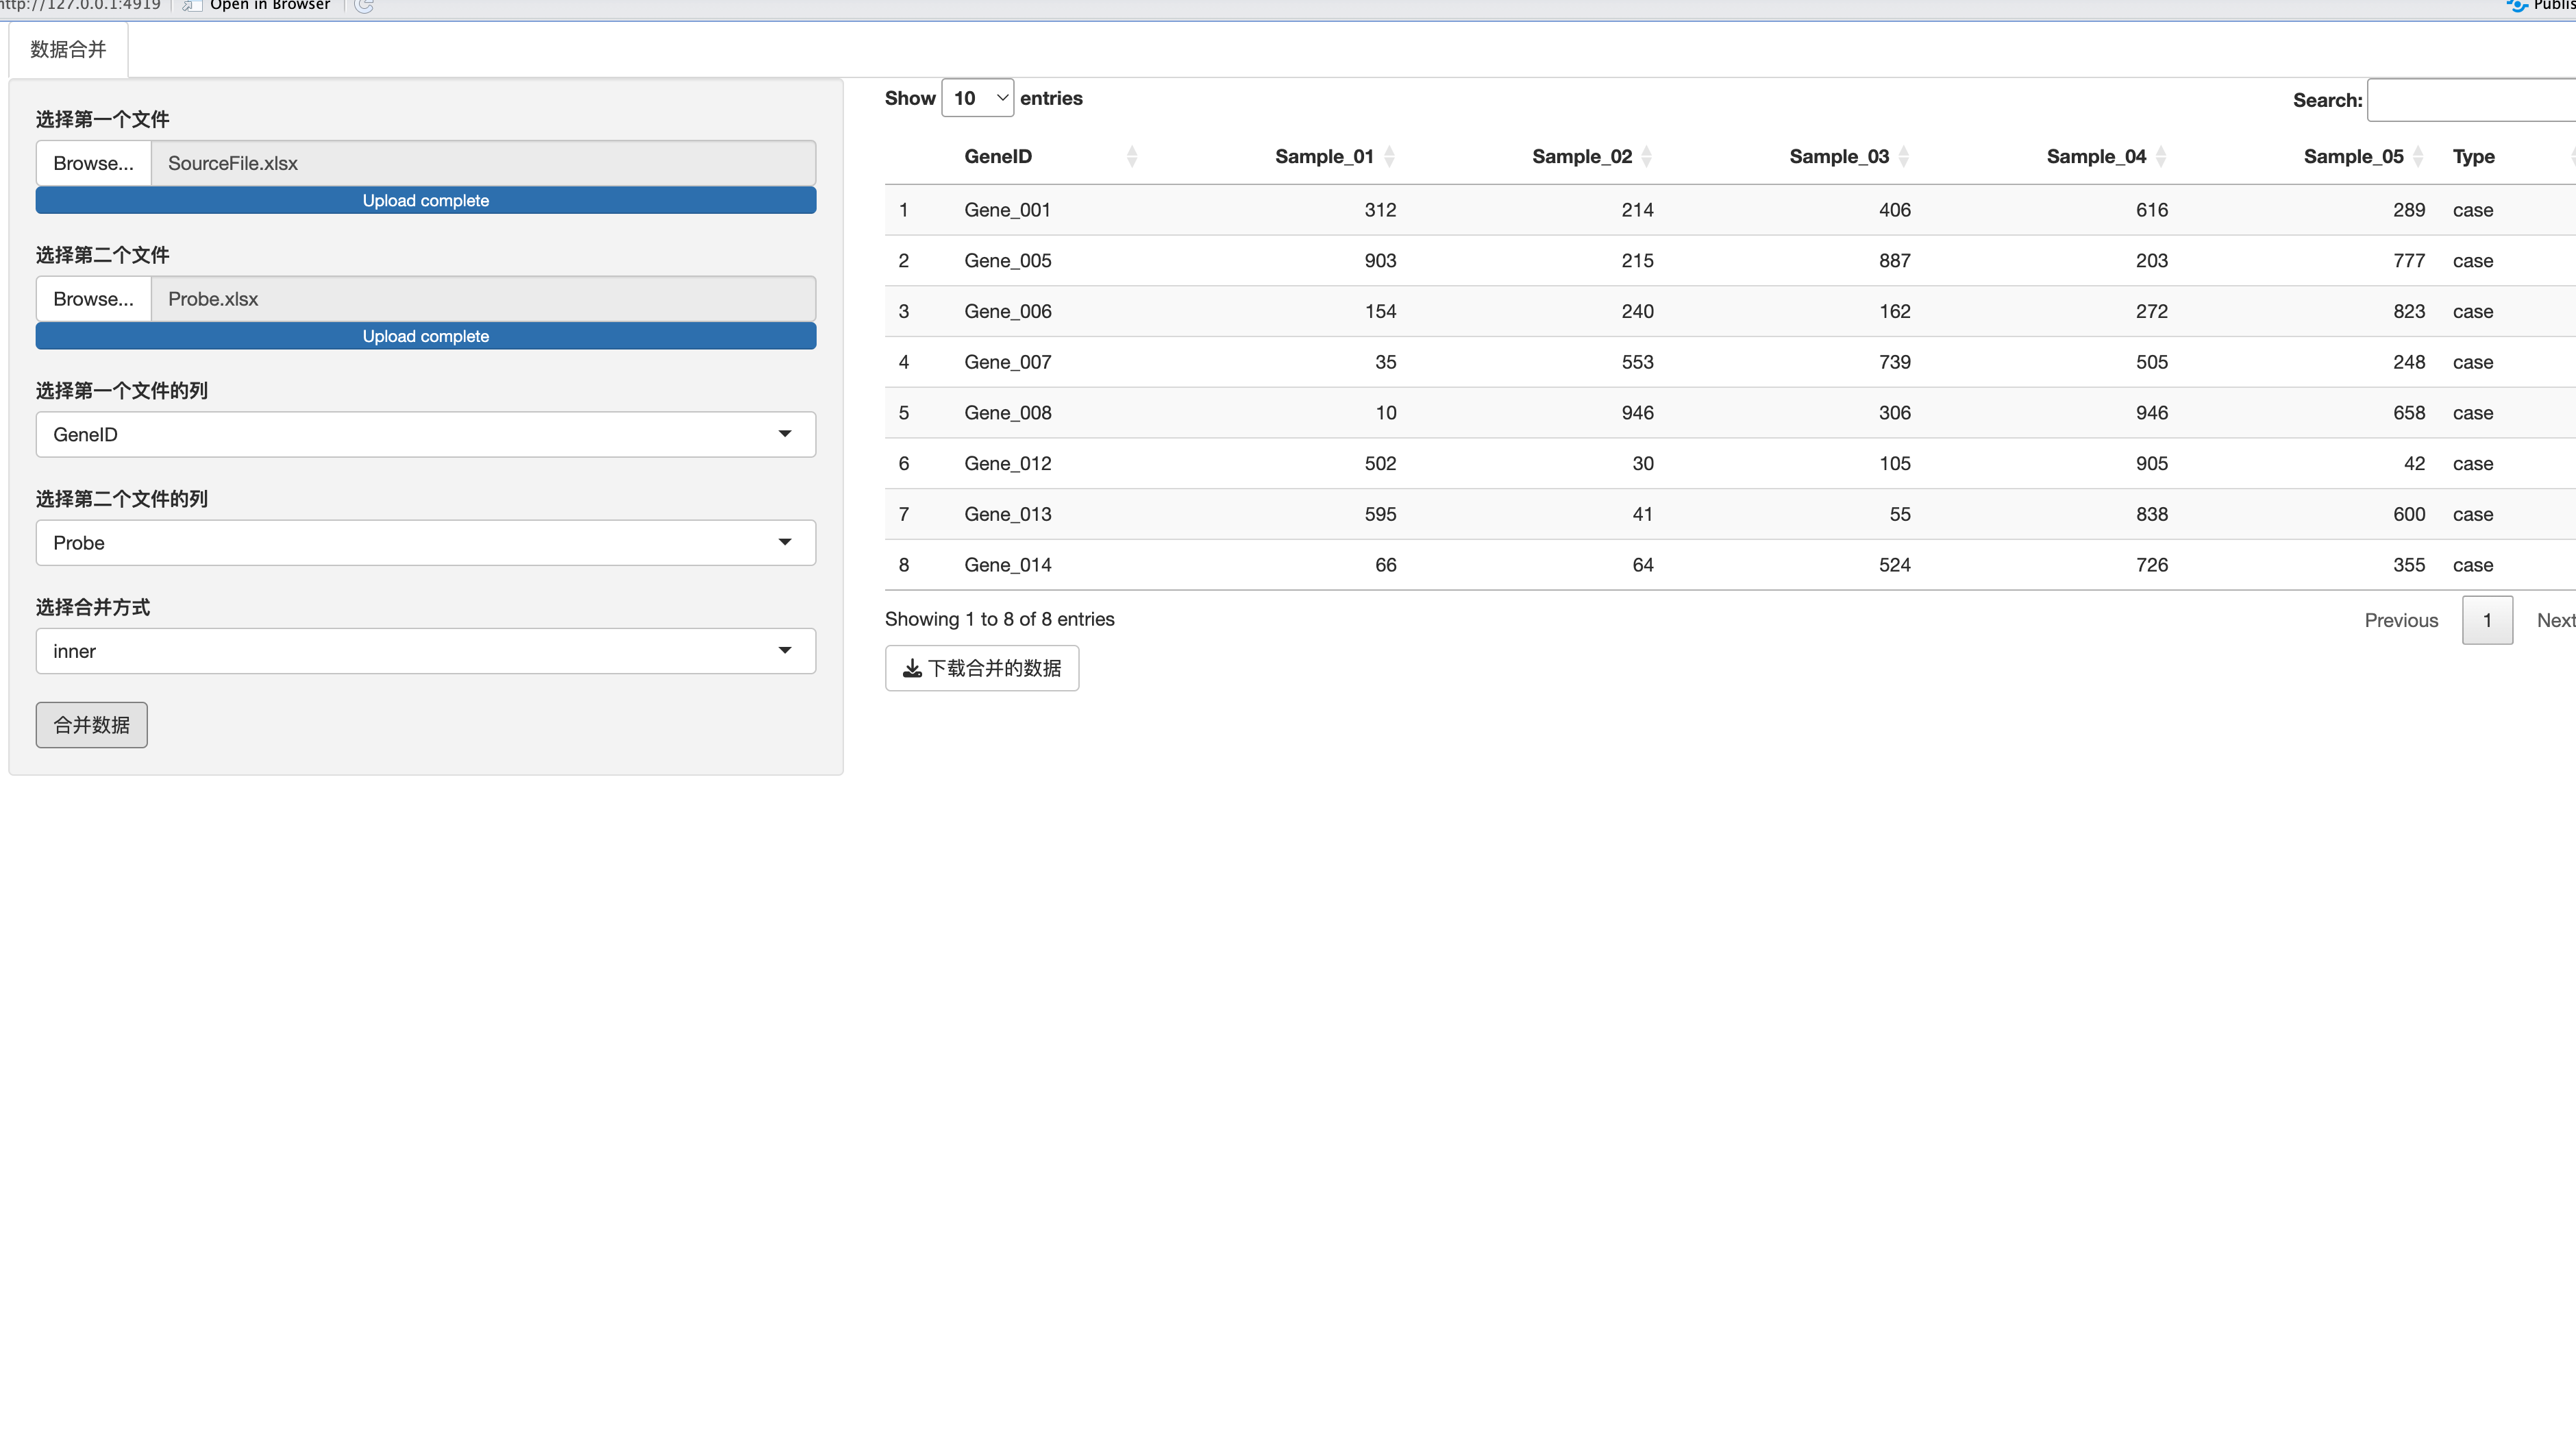
进阶美化
首先我记得之前在学tidyverse的时候看到过join的动画,当时看了半天书没整明白一个gif图给我搞明白了,但是找不到了,就开了联网插件让他帮忙找了下,果然效率很高找到了大佬的github,然后就开始让
它搞定app终极形态。
首先让他将UI转换为dashboard。而且我手动的加上了依赖检测和安装的代码,并且添加了说明的链接。
改下成shinydashboard风格,Gally中链接tidyexplain中对应的动画图片
# 检查依赖 --------------------------------------------------------------------
options("repos" = c(CRAN="https://mirrors.tuna.tsinghua.edu.cn/CRAN/"))
if (!require("DT")) install.packages('DT');
if (!require("bruceR")) install.packages('bruceR');
if (!require("shiny")) install.packages('shiny');
if (!require("dplyr")) install.packages('dplyr');
if (!require("shinydashboard")) install.packages('shinydashboard');
library(shiny)
library(DT)
library(bruceR)
library(dplyr)
library(shinydashboard)

# 设置输入文件大小限制 --------------------------------------------------------------
options(shiny.maxRequestSize = 300*1024^2)

# 前端代码 --------------------------------------------------------------------
ui <- dashboardPage(
  dashboardHeader(title = "数据合并工具"),
  dashboardSidebar(
    sidebarMenu(
      menuItem("数据合并", tabName = "merge", icon = icon("database"))
    )
  ),
  dashboardBody(
    tabItems(
      tabItem(tabName = "merge",
              fluidRow(
                box(
                  title = "文件上传与设置",
                  fileInput("file1", "选择第一个文件", accept = c(".csv", ".txt", ".xlsx"), multiple = FALSE),
                  fileInput("file2", "选择第二个文件", accept = c(".csv", ".txt", ".xlsx"), multiple = FALSE),
                  selectInput("select1", "选择第一个文件的列", ""),
                  selectInput("select2", "选择第二个文件的列", ""),
                  selectInput("joinType", "选择合并方式", choices = c("left", "right", "inner", "full", "anti"), selected = "left"),
                  actionButton("mergeBtn", "合并数据")
                ),
                box(
                  title = "合并结果",
                  dataTableOutput("table"),
                  htmlOutput("linkDescription"),
                  downloadButton("downloadData", "下载合并的数据")
                ),
                box(
                  title = "连接方式图解",
                  width = 12,
                  tags$img(src = "https://raw.githubusercontent.com/gadenbuie/tidyexplain/master/images/join-inner.gif", width = "100%")
                )
              )
      )
    )
  )
)

# 后端代码 --------------------------------------------------------------------
server <- function(input, output, session) {
  # ... [保持server部分代码不变]
}

shinyApp(ui = ui, server = server)
这里的主要变化是:
使用shinydashboard的dashboardPage, dashboardHeader, dashboardSidebar, 和 dashboardBody来创建一个dashboard风格的UI。
在Gallery部分,我链接了tidyexplain项目中的inner_join动画图片作为示例。您可以根据需要更改或添加其他图片。
请确保您的Shiny应用程序目录中没有其他与这些动画图片同名的文件,否则可能会出现冲突。
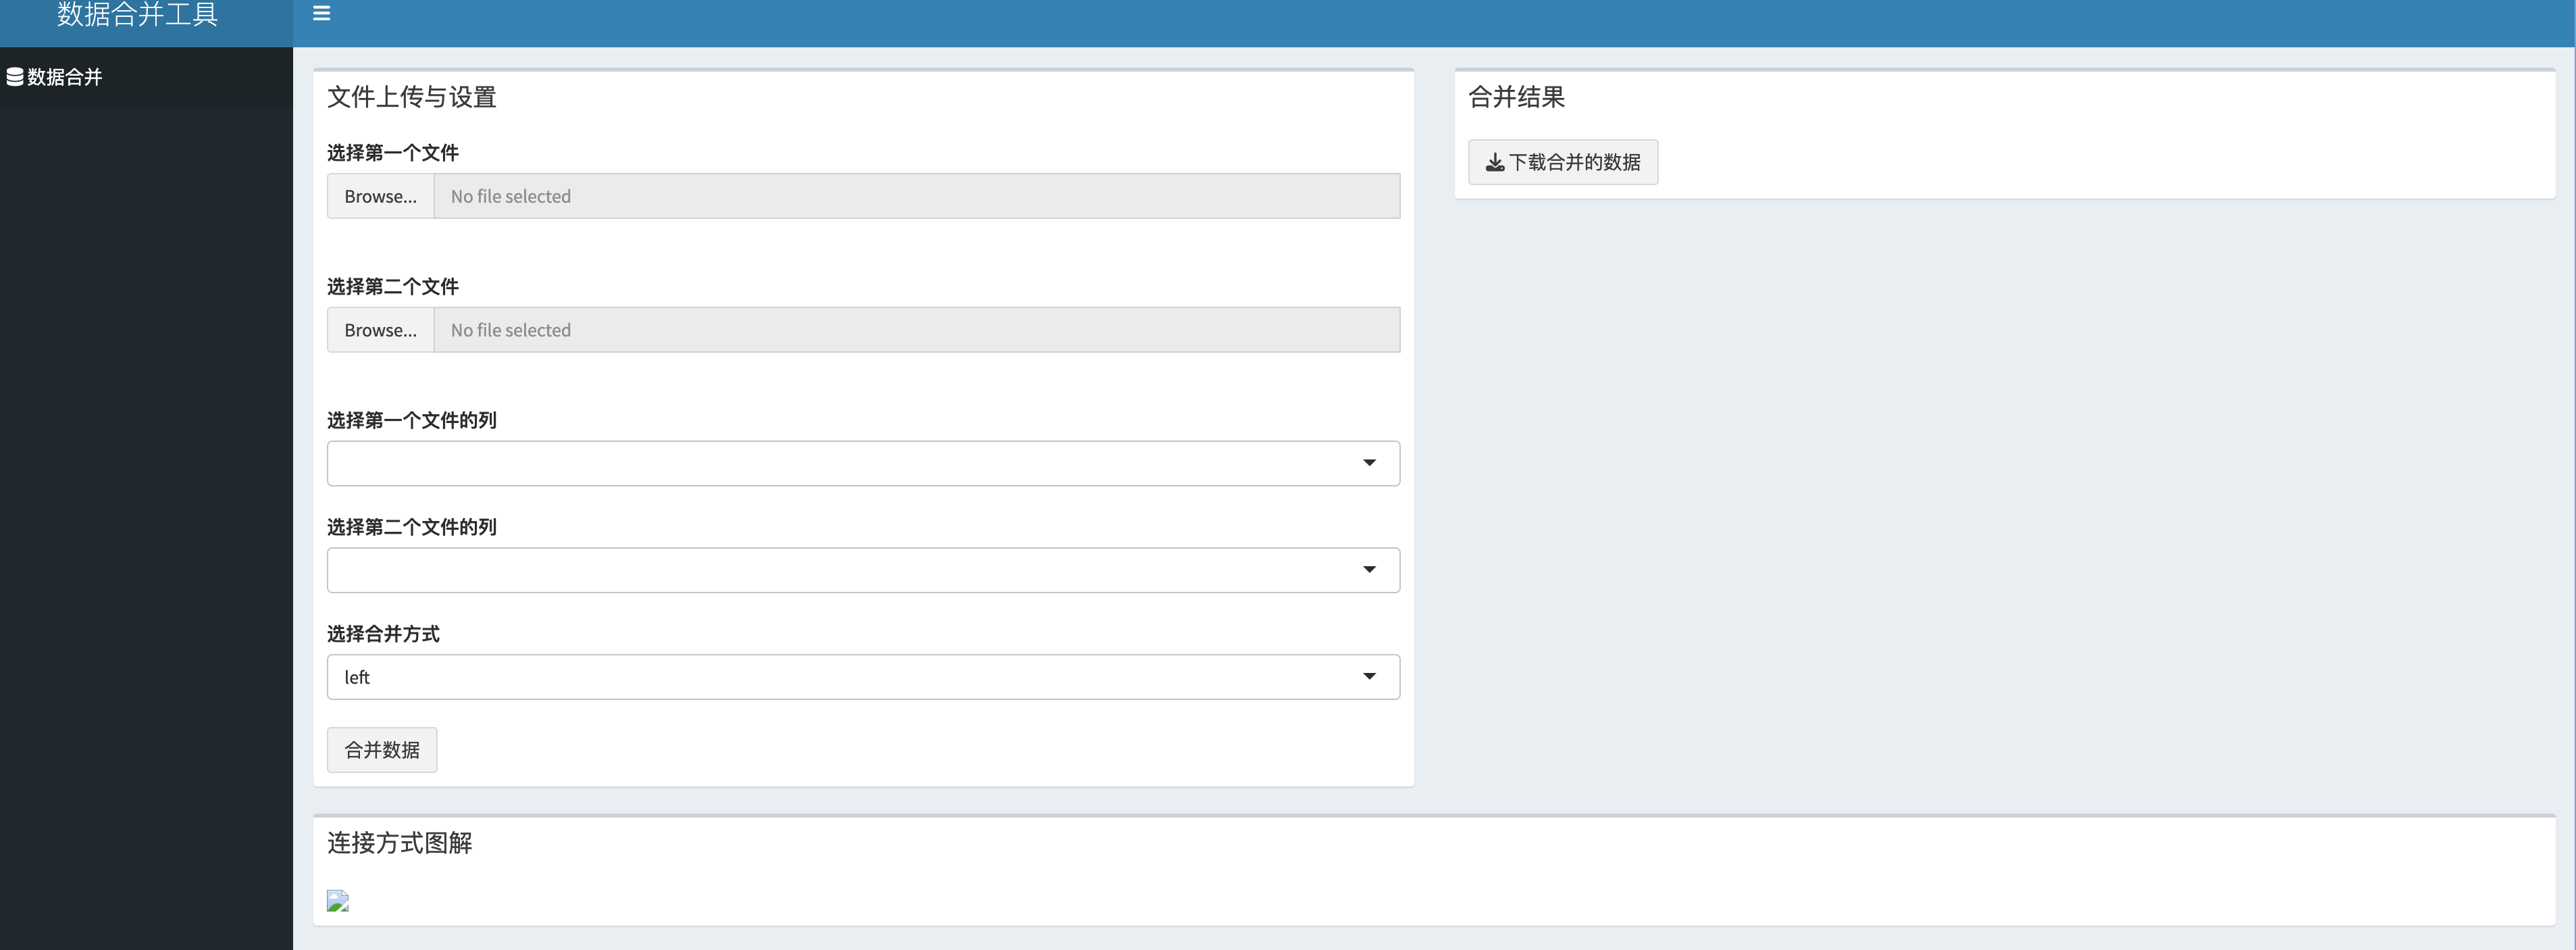
和我想象中的不太一样,我想的是左边有两个选项卡,一个操作,一个帮助,而且图还挂了... 应该是连接搞错了。所以继续指挥:
UI改下,shinydashboar中sidebarMenu中设置两个tag,一个为数据合并,另一个为合并方式说明,文件上传于设置的box宽度窄一些,大部分留给合并结果的box,链接方式图解制作成一个3*2的box,加入semi_join, 声明来源github地址。删除htmlOutput("linkDescription")相关信息
这次没有啥问题了,除了最终我手动改了下连接和box的宽度,最终自动跳网页。完全成型了,达到了开始我脑补的效果,无论是从UI还是功能。
# 检查依赖 --------------------------------------------------------------------
options("repos" = c(CRAN="https://mirrors.tuna.tsinghua.edu.cn/CRAN/"))
if (!require("DT")) install.packages('DT');
if (!require("bruceR")) install.packages('bruceR');
if (!require("shiny")) install.packages('shiny');
if (!require("dplyr")) install.packages('dplyr');
if (!require("shinydashboard")) install.packages('shinydashboard');
library(shiny)
library(DT)
library(bruceR)
library(dplyr)
library(shinydashboard)

# 设置输入文件大小限制 --------------------------------------------------------------
options(shiny.maxRequestSize = 300*1024^2)

# 前端代码 --------------------------------------------------------------------
ui <- dashboardPage(
  dashboardHeader(title = "数据合并工具"),
  dashboardSidebar(
    sidebarMenu(
      menuItem("数据合并", tabName = "merge", icon = icon("database")),
      menuItem("合并方式说明", tabName = "explanation", icon = icon("info-circle"))
    )
  ),
  dashboardBody(
    tabItems(
      tabItem(tabName = "merge",
              fluidRow(
                box(title = "文件上传与设置", width = 3,
                    fileInput("file1", "选择第一个文件", accept = c(".csv", ".txt", ".xlsx"), multiple = FALSE),
                    fileInput("file2", "选择第二个文件", accept = c(".csv", ".txt", ".xlsx"), multiple = FALSE),
                    selectInput("select1", "选择第一个文件的列", ""),
                    selectInput("select2", "选择第二个文件的列", ""),
                    selectInput("joinType", "选择合并方式", choices = c("left", "right", "inner", "full", "anti","semi"), selected = "left"),
                    actionButton("mergeBtn", "合并数据")
                ),
                box(title = "合并结果", width = 9,
                    dataTableOutput("table"),
                    downloadButton("downloadData", "下载合并的数据")
                )
              )
      ),
      tabItem(tabName = "explanation",
              fluidRow(
                box(title = "连接方式图解", width = 12,
                    tags$div(tags$img(src = "https://raw.githubusercontent.com/gadenbuie/tidyexplain/main/images/inner-join.gif", width = "30%"),
                             tags$img(src = "https://raw.githubusercontent.com/gadenbuie/tidyexplain/main/images/left-join.gif", width = "30%"),
                             tags$img(src = "https://raw.githubusercontent.com/gadenbuie/tidyexplain/main/images/right-join.gif", width = "30%")
                    ),
                    tags$div(tags$img(src = "https://raw.githubusercontent.com/gadenbuie/tidyexplain/main/images/full-join.gif", width = "30%"),
                             tags$img(src = "https://raw.githubusercontent.com/gadenbuie/tidyexplain/main/images/semi-join.gif", width = "30%"),
                             tags$img(src = "https://raw.githubusercontent.com/gadenbuie/tidyexplain/main/images/anti-join.gif", width = "30%")
                    ),
                    tags$div(style = "margin-top: 20px; text-align: center;",
                             "图片来源:", tags$a(href = "https://github.com/gadenbuie/tidyexplain", target = "_blank", "tidyexplain GitHub项目")
                    )
                )
              )
      )
    )
  )
)


# 后端代码 --------------------------------------------------------------------
server <- function(input, output, session) {
  data1 <- reactive({
    req(input$file1)
    import(input$file1$datapath)
  })

  data2 <- reactive({
    req(input$file2)
    import(input$file2$datapath)
  })

  observe({
    updateSelectInput(session, "select1", choices = names(data1()))
  })

  observe({
    updateSelectInput(session, "select2", choices = names(data2()))
  })

  merged_data <- eventReactive(input$mergeBtn, {
    req(input$select1, input$select2, input$joinType)
    switch(input$joinType,
           "left" = left_join(data1(), data2(), by = setNames(input$select2, input$select1)),
           "right" = right_join(data1(), data2(), by = setNames(input$select2, input$select1)),
           "inner" = inner_join(data1(), data2(), by = setNames(input$select2, input$select1)),
           "full" = full_join(data1(), data2(), by = setNames(input$select2, input$select1)),
           "anti" = anti_join(data1(), data2(), by = setNames(input$select2, input$select1)),
           "semi" = semi_join(data1(), data2(), by = setNames(input$select2, input$select1))
    )
  })


  output$table <- renderDataTable({
    req(merged_data())
    merged_data()
  })

  output$downloadData <- downloadHandler(
    filename = function() {
      paste("merged_data.csv")
    },
    content = function(file) {
      write.csv(merged_data(), file = file,row.names = F)
    }
  )
}

shinyApp(ui = ui, server = server,options = list(launch.browser = TRUE))
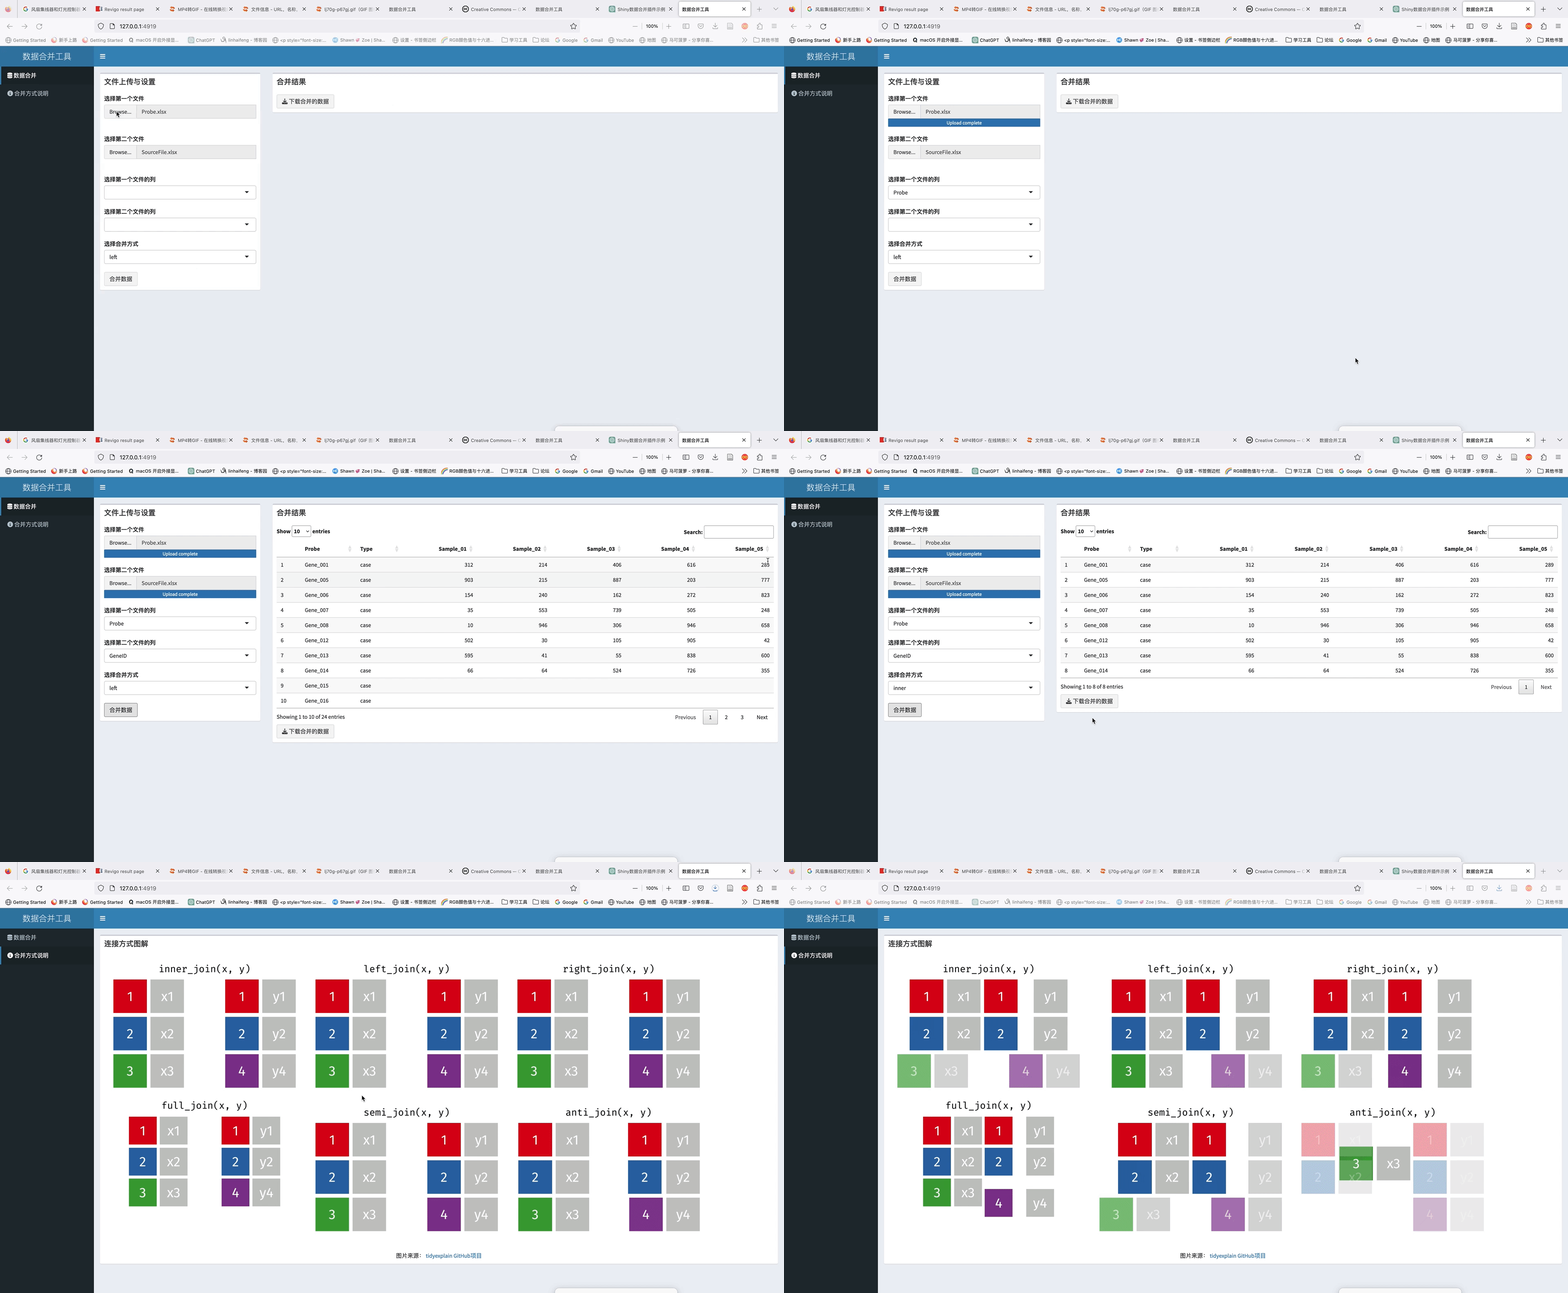
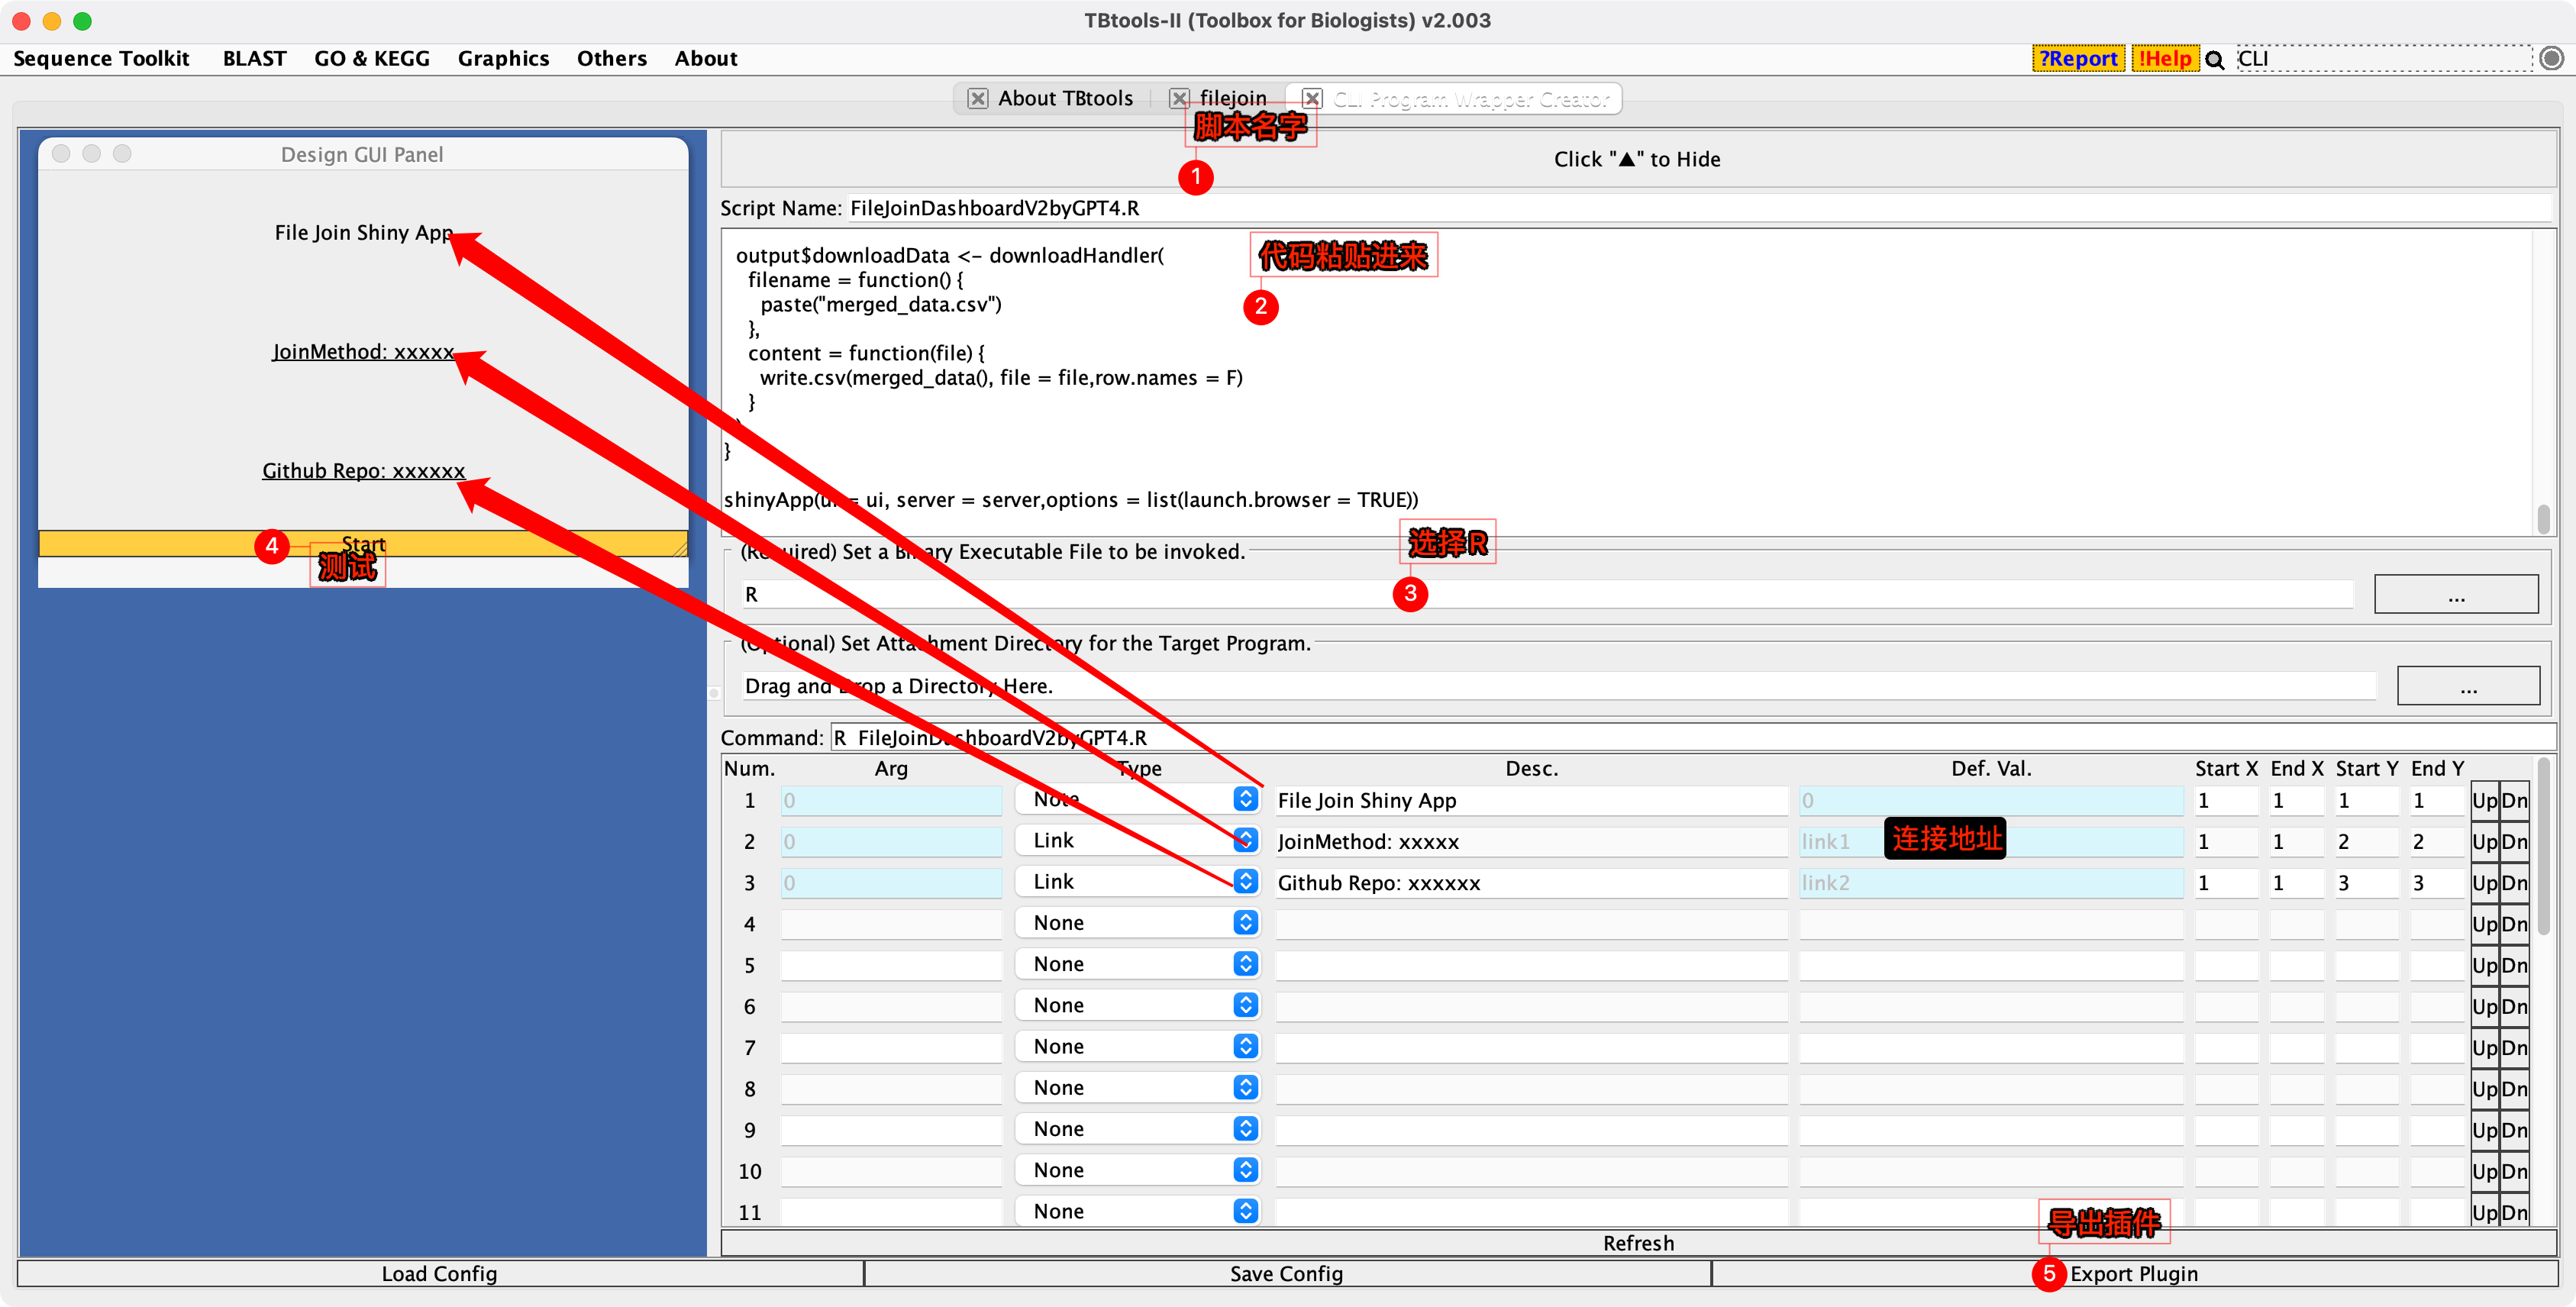
TBtools 插件打包
之前要搞个shiny插件,最头疼的就是依赖,最后都要麻烦CJ来搞定,CLI program wapper creator的出现直接把难度降低成了0。太xxx6了!!! 根据下图... 直接搞定,然后就联系CJ分享你的ShinyApp吧!
